3.2 Setup single Node
3.2.1 Server Preparation
Preparing for working with a node begins with the deployment of the basic software, primarily the operating system. Only one deployment option is discussed below, please contact partnership@dgt.world for other options and for more information.
3.2.1.1 Minimal Requirements
The minimal configuration involves deploying a single node with minimal performance and a limited set of node services.
Parameter |
Minimal Requirement |
Recommendation |
|---|---|---|
CPU Architecture |
X86_64; ARM;s390x;ppc64Ie |
X86_64 |
Number of CPUs |
1 |
2 |
CPU Performance |
1500 bogomips [1] |
2000 bogomips |
CPU features |
svm|vmx |
|
RAM |
4 GB |
8GB |
Free Disk Space in $HOME |
8 GB |
30 GB |
Internet Access |
Required |
|
Virtual Machine |
Recommended /VirtualBox |
|
Type of OS |
Linux |
Regardless of the hardware configuration, the recommended software is presented below in its own minimum configuration:

3.2.1.2 Deployment Options
- You can also consider the following options for deploying a standalone DGT node:
deploying a single node on a single physical server in a basic configuration;
installing and configuring a node on a virtual machine (VirtualBox, VMWare, Virtual PC);
deploying a scalable solution using multiple servers and clustering technology (request partnership@dgt.world)
use a pre-built virtual machine image (Pre-Built Virtual Machine Images) - see 3.2.1.3;
cloud host deployment (Digital Oceans; currently in development).
3.2.1.3 Using Pre-Built Virtual Machine Images
When using this option, you can use a ready-made DGT node image that is available for download onto your computer. You can immediately use the node on your equipment. The following images are available for download:
# |
Virtual Machine Image |
Description |
MD5 Checksum |
Size |
|---|---|---|---|---|
1 |
VirtualBox VM image running Ubuntu 20.02 with Docker 20.10.2 deployed and DGT Matagami Core installed (no tokenization); no dashboard installed User Login: dgt User Pass: matagami2022 |
51999f 151fc508c546f f6076b3a3a1e3 |
2.4 GB/8.4 GB |
|
2 |
VMWare Matagami Core 2022 Image |
VMW are-formatted VM image running Ubuntu 20.04 with Docker 20.10.2 deployed and DGT Matagami Core installed (no tokenization) no dashboard installed User Login: dgt User Pass: matagami2022 |
Basic steps to get started:
Get ready: you must have at least 20 GB of free space available on your hard drive (see requirements see 3.2.1.1). You must install a program to support virtual machines (choose depending on the image used: VirtualBox, VMware Workstation Player/ Workstation Pro).
You should be able to unarchive a .rar archive (WinRar is recommended).
You should have a basic understanding of the Linux system and its commands. Recommended: « Getting Started with Ubuntu 16.04»
Download the selected virtual machine image. Be sure that this is an authentic image - verify the checksum and compare it with the value in the table above. To get the checksum:
For the Windows operating system: open the command line interface (Press <Windows R>, type
cmdand press <Enter>), use thecdcommand to navigate to the folder where the file was downloaded and type the commandcertutil -hashfile <file> MD5, where <file> is replaced by the name of the archive loaded. The screen should display the checksum, which is what you need to compare to the value in the table above.For the Linux operating system: use the <cd> command to navigate to the download folder, type
md5sum <file>to obtain the checksum, and compare the value to the data in the table.Expand the archive into a separate folder by using the archiver. Inside it, you will find virtual machine files - the configuration file and the virtual hard disk file. Open the file and edit the network interfaces by using a virtual machine manager (VirtualBox or VMWare). For more details, see VirtualBox.Virtual Networking and VMWare Virtual Networking Concepts.
Launch the virtual machine and log in using your username and password (see the table above).
Use the steps described in 3.2.3 to control the startup of the node and conduct the necessary testing.
3.2.1.4 OS Setup and initialization
The information presented here and below is focused on installing the Ubuntu operating system and then downloading the DGT source files from GitHub. In case of other parameters, use the necessary clarifications or get advice from partnership@dgt.world
Download an operating system image, such as Ubuntu 20.04.3.
Prepare the server for booting or create a stub for the virtual machine (see the manual for VirtualBox or VMWare). Check the minimum system requirements - see 3.2.1.1.
Install the operating system using the proper user guide. For example, the official guide is recommended for Ubuntu. Enter the required credentials [2], e.g.
login: dgt, password: matagami2022.For the Linux system, install additionally:
Open SSH (read more here)
Midnight Commander (optional, see here)
Python 3.9 (see here)
SFTP/FTP for enabling remote access to server files (see also here)
3.2.1.5 Docker Installation
Whether you are downloading files directly from GitHub or using prepared installation files, the most convenient way to assemble the node is to use Docker, a deployment automation and container management software. The following is a sequence of steps to install the Docker container management tool for the Docker operating system.
Update:
sudo apt updateInstall auxiliary utilities:
apt-transport-https — activates the transfer of files and data through https.
ca-certificates — enables verification of security certificates.
curl — utility for accessing web resources.
software-properties-common — activates the ability to use scripts to manage software
sudo apt install apt-transport-https ca-certificates curl software-properties-commonAdd a GPG key to operate with the official Docker repository:
curl -fsSL https://download.docker.com/linux/ubuntu/gpg | sudo apt-key add -Add the Docker repository into the local list of repositories:
sudo add-apt-repository "deb [arch=amd64]
https://download.docker.com/linux/ubuntu $(lsb_release -cs) stable"
Re-update the data on operating system’s packages:
sudo apt updateInstall the Docker package itself:
sudo apt install docker-ce -yInitialize the Docker daemon and add it to startup:
sudo systemctl start docker
sudo systemctl enable docker
More information is available in the official Docker guide
3.2.1.6 Setup Docker Compose
Warning
It is not recommended to use a version of Docker Compose other than 1.21.1 for this version of DGT
Docker Compose is a tool for describing and running multi-container Docker applications. The tool allows users to start, execute, communicate, and close containers with a single command.
We download the Docker Compose assembly directly from the GitHub repository with the required versions and options:
-L allows redirects if the file is moved.
-o modifies the file name to make it easier to run and specifies the directory to save.
sudo curl -L
"https://github.com/docker/compose/releases/download/1.23.1/docker-compose-$(uname -s)-$(uname -m)" -o /usr/local/bin/docker-compose
Installation options:
Specify a different version, for example, “1.28.6” instead of “1.23.1”
Install from repository:
sudo apt-get install docker-composeAfter the download is complete, you will need to add execution rights to the downloaded binary file:
sudo chmod +x /usr/local/bin/docker-composeWe check the correctness of the Docker Compose operations:
sudo docker-compose -version
3.2.1.7 Post-Installation actions
To support the workability of bath-files, we configure rights and groups:
Create a Docker group:
sudo groupadd dockerAdd the current user to the created group:
sudo usermod -aG docker $USERActivate changes in the group:
newgrp dockerWe check the ability to run Docker commands for the current user (without sudo):
docker run hello-worldIn case of running Docker commands before adding a user to a group (which is what happens, if we take the checks into account), an error occurs with incorrect rights to the
~/.docker/.directory.Warning: Error loading config file: /home/user/.docker/config.json - stat /home/user/.docker/config.json: permission deniedTo fix this, we will use the following commands:
sudo chown "$USER":"$USER" /home/"$USER"/.docker -R
$ sudo chmod g+rwx "$HOME/.docker" -R
Check again:
docker run hello-world.
3.2.1.8 Last check before launch
Before proceeding with the installation of the DGT Node, check that you have completed the necessary preparatory steps and that the system requirements are met:

Tip
READ MORE:
DGT Technical Deep Dive [10] - a visual representation of the architecture and technology stack of the platform.
Ubutu Tutorials. The Linux command line for beginners - a guide to using the basic commands for the Linux OS family.
Licenses and Standards [21] - clarifications of licenses for open source software from the Open Source Initiative (OSI)
Docker Engine Official Guide - a guide to setting up containerization tools
3.2.2 Setup DGT Single Node
This given installation process describes the necessary steps to deploy a single node. The description is for the CORE configuration, but can be adapted to work with other versions.
First, you need to obtain the system’s source code from GitHub. DGT has several repositories on GitHub, each of which corresponds to a certain version of the platform - see 1.7. Please use the last version. This description is provided for the Matagami version in its CORE configuration. To start working, we clone the GitHub repository:
git clone https://github.com/DGT-Network/DGT-MatagamiAs a result of execution, the DGT Matagami/CORE directory is created on the user’s home folder (HOME/DGT), from which the server image is built.
Go to the appropriate folder and make sure the files are there:
cd DGT/DGT-Matagami
cd CORE
As a result of deploying a node, some of the general settings will be copied into the node’s configuration. To edit them and add more settings:
Access the directory with the system settings:
cd DGT-Matagami/CORE/etcSet up the parameters of the node’s certificate, which will be created when connecting to the network. For that, edit the parameters of the
certificate.jsonfile, setting up the correct names for the administrator’s country, region, and e-mail. To connect to private segments, you must register these parameters:nano certificate.json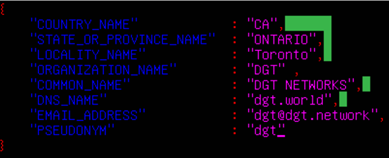
Edit the network’s parameters (dgt.net.map, dgt.conf.static, entry_points.json) - see 3.6 (skip this step if setting up a single node).
After defining the settings, move towards building the node’s image.
We carry out the initial assembly of the node using Docker Compose. Run the assembly (rise) command from the directory in which the assembly is placed (DGT/DGT-Matagami/CORE):
bash upDgtCluster.sh -G -SC -CB openssl 1 1
- Here
-G - flag, indicating the need to create a genesis block
-SC - flag indicating that transactions need to be signed by nodes
-CB openssl - the selected type of cryptography (should be consistent with the network that the node belongs to): options are - openssl or bitcoin
1 1 - cluster number and node number in the cluster; for a single node we set “1 1”. Te mapping of the number to a variant notation using segments and clusters is reflected in the dgt.net.map file.
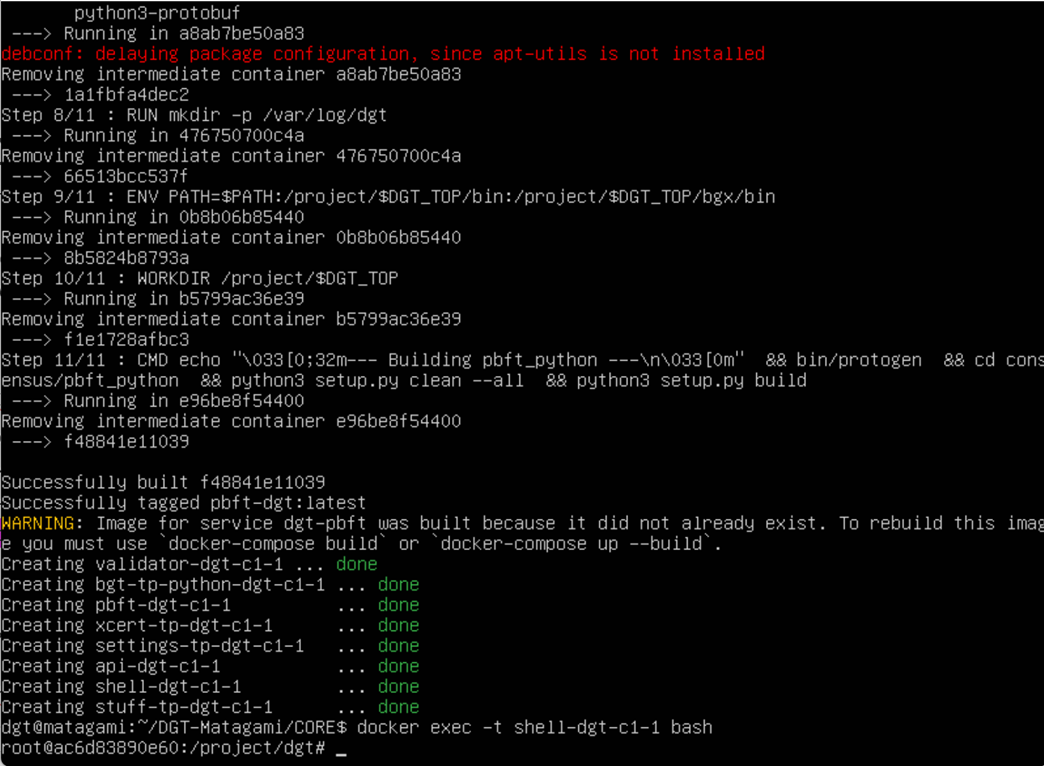
The assembly process is quite long, accompanied by the installation of additional packages. A typical output is shown in the figure below:
Warning
The full assembly process is conducted only when updating the home directory of the project (DGT-Matagami/CORE). Afterwards, a simplified process of launching the relevant container is conducted.
3.2.3 Dashboard setup
A “Dashboard” is a special node component that allows you to execute individual node commands, as well as monitor the network. The service is located inside a separate container and may not be available for this node. It is installed separately.
The server is installed from the directory into which dgt is loaded with the command:
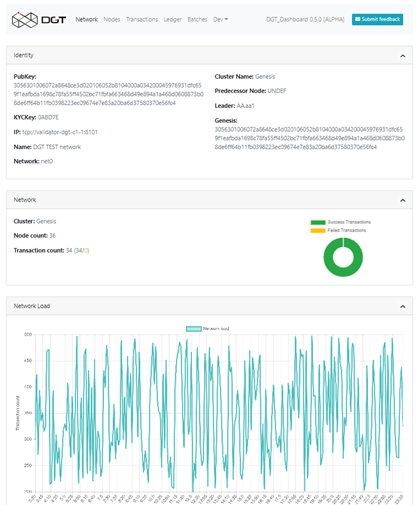
bash upDgtDashboard.sh -CB opensslIn case of successful installation, DASHBOARD becomes available for the node’s IP:
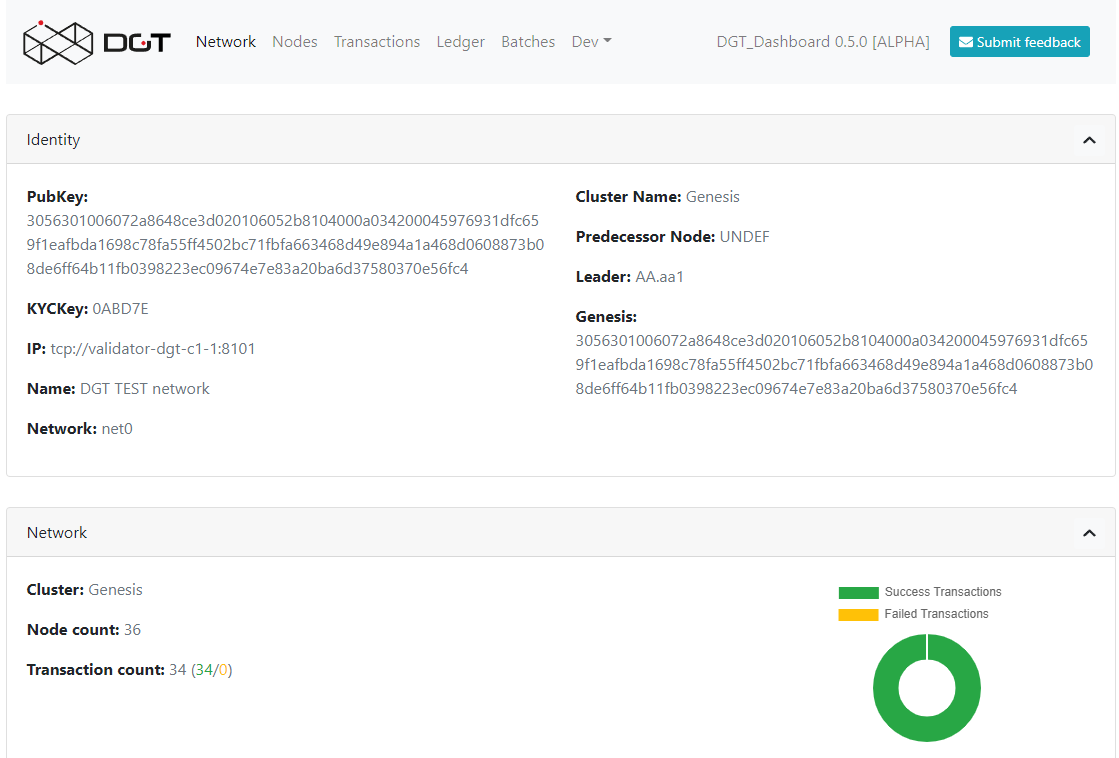
http://[NODE_IP]:8003/, for example, http://192.168.1.53:8003/. In response to loading, the browser (Dashboard) displays a panel with main sections presenting information about the network:
Network - presents basic information about the node and the overall topology
Nodes - detailed information on the network topology, node roles, and existing dependencies
Transactions - information on processed transactions
Ledger - a representation of the DAG graph (related packages).
Batches - information on transaction batches
Dev - additional developer tools, including creating test transactions
When installing a node, use the following checklist to ensure the right sequence of steps for guaranteeing success:
# |
Action |
Description |
Complete? |
|---|---|---|---|
1 |
Check Environment Setup |
Check the environment’s configuration, including Ubuntu installation (at least 20.04), ssh service installation, Docker version (docker -version), Docker Compose version (docker-compose -version) |
▢ |
2 |
Clone DGT Version |
Check for the DGT version (or clone github: «git clone https://github.com /DGT-Network/ DGT-Matagami») |
▢ |
3 |
Build version with upDgtCluster.sh |
Go to the DGT’s home directory (for example, cd DGT-Matagami/CORE/). Build the main kernel version with the «bash upDgtCluster.sh -G -SC -CB openssl 1 1» command. After loading additional components and the build process, the container startup process should complete successfully, including the launch of the validator, bgt, xcert, settings, and API services. |
▢ |
4 |
Start DGT CLI |
Check the ability to access the DGT CLI using the command «docker exec -it shell-dgt-c1-1 bash». In case of successful access to the node’s command interpreter, return to the operating system command line (“exit” command). |
▢ |
5 |
Build Dashboard |
Build the DGT Dashboard service using the «bash upDgtDashboard.sh -CB openssl» command. After the assembly is completed, open the Dashboard service page (http://[N ODE_IP]:8003/) in the browser window of your workstation. The browser page should load in response. |
▢ |
3.2.4 Nodes Port Configuration
As a result of installing the node in given containers, several services are launched, the ports of which are presented in the table below. Open ports can be checked with the sudo ss -ltn command.


DGT nodes can use various network ports for communication, which are configured through environment variables set up by the upDgtCluster.sh script in the DGT director (for example, /DGT-Matagami/CORE):
API=8108 (API service)
COMP=4104 (supporting transaction families)
NET=8101 (supporting the network)
CONS=5051 (consensus service)
3.2.5 Single Node Check
3.2.5.1 BGT-based CLI tests
BGT is a test transaction family that supports abstract tokens within the network. Accessing BGT is possible in various ways, including using the command line interface - CLI. To use the CLI, you need to call bash inside the container.
We call bash inside the container:
docker exec -it shell-dgt-c1-1 bashInside the container, we execute the command to create a wallet and transfer a sum to it:
bgt set WAL 7777 -url http://api-dgt-c1-1:8108As a result, a WAL wallet is created, to which 7777 BGT tokens were credited.
Checking the list of enrollments:
bgt list -url http://api-dgt-c1-1:8108Sample output:

To add funds, conduct transfers, reduce within the bgt family, you can also use the commands (full list bgt -h):
set - sets the bgt value
inc - increases bgt value
dec - reduces dgt value
trans - transfers tokens from wallet to wallet
show - shows a specific value for this wallet
list - a list of all wallets and their amounts
For example, increasing wallet values is performed by the command:
bgt inc WAL 102 -url http://api-dgt-c1-1:8108Sample output:

For more information on using the DGT CLI, see 3.6.
3.2.5.2 Rest API Test
The health check presented above using the BGT transaction family may not be sufficient for a number of situations: the CLI client (see 3.6) interacts with the node through API like any other client, at the same time, this interaction involves the internal (local) network of the node, which does not allow assessing the impact of network effects that are significant when testing distributed interaction. Using direct API calls allows you to:
Check the passage of transactions through the network.
Access network “costs” in terms of performance and scalability.
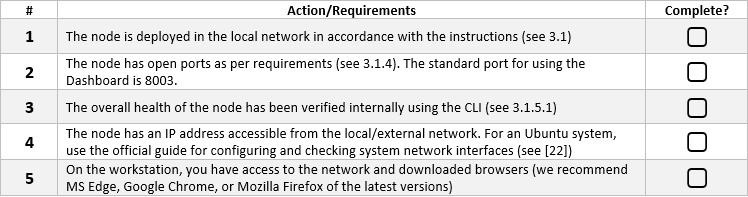
Each node is equipped with an API server that, in the basic configuration, responds on port 8108 (see 3.2.4). To carry out checks, you must ensure the following conditions are met:
# |
Action/Requirements |
Complete? |
|---|---|---|
1 |
The node is deployed in the local network in accordance with the instructions (see 3.1) |
▢ |
2 |
The node has open ports as per requirements (see 3.1.4) |
▢ |
3 |
The overall health of the node has been verified internally using the CLI (see 3.1.5.1) |
▢ |
4 |
The node has an IP address accessible from the local/external network. For an Ubuntu system, use the official guide for configuring and checking system network interfaces (see [22]) |
▢ |
5 |
You have API testing tools installed and prepared. Recommended:
|
▢ |
Verification will be carried out by obtaining a list of transactions for a given node. Even in the case of a newly installed node, this list cannot be empty, since the node initialization procedures include settings for its topology performed through a special transaction family (see 2.3). Depending on the tools you use:
When using CURL, type the following in the command line interface:
curl -v [NODE_URL]/transactions
Here the [NODE_URL] - is the tcp-address of the node, including port. For example,
curl -v http://192.168.1.53:8108/transactions
As a result of executing such a command, the server will return a list of current transactions in JSON format. A typical output is shown below:

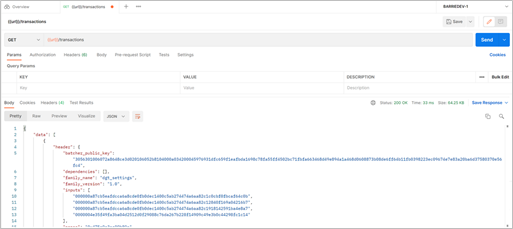
When using POSTMAN, load the local version, configure the Environment (see Environments tab) by setting the local variable url = NODE_URL (node’s IP: Port). Select the new GET command and enter the value:
{{url}}/transactions
If successful, the command should return a result similar to the one shown in the figure below.
3.2.5.3 Check the DGT Dashboard
The standard node comes with a built-in dashboard, which can make health checks much easier. This component is optional and must be run separately - see 3.2.3. Make sure that you have completed the necessary preparatory steps.
To conduct the testing itself, open your browser and follow these steps:
Go to the Dashboard by typing
http://[NODE_IP]:8003/in the address bar. For instance, http://192.168.1.53:8003/. If the service is operational and the network configuration is correct, the main Dashboard page will load:
For further testing, go to the Dev/Batch Creator tab. The presented functionality allows you to create test transactions. Select the following options:
Family: bgt
Command: set
wallet: WALX
amount: 1000
The name of the wallet and the BGT amount can be specified arbitrarily. Execute the transaction (Execute) and if successful, the results of the transaction will be similar to those shown below:

Experiment with other DGT commands by creating wallets, transferring tokens to them, and ensuring the operations are correct (for a complete list of DGT operations, see 4.1).
3.2.5.4 Unified single node check
To verify that a single node installation works correctly, please use the following test to verify that the node is available and working:
# |
Action |
Description |
Is Complete? |
|---|---|---|---|
1 |
Check Environment |
Make sure the system is deployed and assembled without errors, including the core services and Dashboard. Use the appropriate procedures (see 3.1.3, 3.1.5.3 ) |
▢ |
2 |
Check CLI with BGT Transaction Family |
Navigate to the command line of the deployed node with the «docker exec -it shell-dgt-c1-1 bash» command. The command line prompt will change to «root…:/project/dgt». Run the command for creating the WALLET1 wallet (or any other name, if this wallet was created earlier: «bgt set WALLET1 1000». If successful, repeat the command for creating a second wallet: «bgt set WALLET2 1000». Transfer tokens from the first wallet to the second: «bgt trans WALLET1 500 WALLET2». Print a list of wallets for the bgt family using the command: «bgt list». The output should reflect the list of wallets and the wallet balances that changed due to the transfer: «WALLET1: BGT_token=500 WALLET2: BGT_token = 1500» |
▢ |
3 |
Check CLI Command to show all transactions |
Without leaving the CLI of the node, enter the command to display the list of transactions: «dgt transaction list». The command should display a list of all transactions in the DAG. |
▢ |
4 |
Check CLI/xcert |
To check the processing of certificates, we use the command of their creation based on the key generated earlier: «xcert set /project/dgt /etc/certificate.json -user /root/ .dgt/keys/root.priv». The successful output of the certificate’s contents guarantees the performance of the corresponding functionality. The output of “xcert list” certificates should provide for outputting data created on the base of the certificate’s template. Close the CLI console with the “exit” command. |
▢ |
5 |
API Quering |
To check the functionality of the API, they must be accessed through the appropriate client tool. On the external machine, open the command line interface (or the POSTMAN toolkit). Execute the listing of transactions: «curl -v http://[NODE_IP]: 8108/transactions». This command displays a list of transactions based on the network settings. Additionally, let’s display the information for each separate transaction. To do this, copy the Transaction_ID (header_signature - 128-144-digit code in the form of “3046022…d630fd”) for any transaction randomly selected from the list. The output of transaction details is given by the command «curl -v http://[NODE_IP]: 8108/transactions/ TRANSACTION_ID». |
▢ |
6 |
Dashboard Check |
Checking the health of the Dashboard component (if it was installed) is carried out through the operations of the bgt family. Load the Dashboard in the browser of the client computer: Open the «Dev/Batch Creator» tab. Select the following in the Create Batch section: Family = bgt; Url = «tcp://val idator-dgt-c1-1:8101» , command = «set». In the additional fields, enter the information about the transaction: wallet = “DSHBTEST”, amount = “700” Press execute and you should receive a link to the transaction status: http://[NODE_IP] /batch_statuses? amount=700&cmd=set… Press the Refresh button and you should receive the information on the transaction’s status; if successful, it will display: COMITTED. Copy the transaction ID: «“id”: “3046022100…» (just the ID itself) Head over to the “Transactions” tab, find the transaction of the bgt family among the first lines, highlight it, and in the pop-up window, check the transaction id against the “header_signature” field. |
▢ |
7 |
Direct BGT API |
Check the processing of the bgt transaction (by direct API access) with the endpoint run and curl utility. Create a new wallet: curl “http://[NODE_IP]: 8108/run?family=bgt&u rl=tcp%3A%2F%2Fvalida tor-dgt-c1-1%3A8101&c md=set&wallet=TESTWAL LET&amount=1000” [3] In case of success, you should receive a check with a link to success. The status of the created wallet is checked by the command: curl “http: //192.168.1.166:8108/ run?family=bgt&cmd=sh ow&wallet=TESTWALLET” In case of success, a link to the wallet and its value are returned: «”value”:1000» Reduce the number of tokens in the wallet by a sum exceeding the one set before: curl “http://[NODE_IP]: 8108/run?family= bgt&cmd=dec&wallet=TE STWALLET&amount=1200” This transaction returns a check with a display of the transaction (batch) ID: “id= 3045022100fcc9 cc0e1e5cda651e5b33…”. Verify the operation’s status: curl “http://[NODE_IP]: 8108/batch_st atuses?id=[BATCH_ID]” With the output ID, the result is provided with the “INVALID” status. The wallet status is checked with the command curl “http://[NODE_IP]:8108 /run?family=bgt&cmd=sh ow&wallet=TESTWALLET” It should display an unchanged balance of 1000 BGT |
▢ |
Footnotes